Great Putting Part 3 - Drills.
Great Putting Part 3 - Drills.
Hi, I’m Mel Sole, Director of Instruction at the Mel Sole Golf School, headquartered at Pawleys Plantation Golf and Country Club in Pawleys Island, SC. We conduct 1, 2 and 3-day golf schools, hourly golf lessons, and senior golf schools—any golf instruction program your heart desires. Give us a call at 800-624-4653 or 843-237-4993. We will be happy to book a commuter school or a package that contains accommodations, golf, and golf school.
Monthly Golf Tip by the Mel Sole Golf School.
As mentioned in my last two golf tips, I recently attended the "1 Putt Golf School" in Winston Salem, NC. This month's tip features Putting Part 3: Drills for a Perfect Putting Stroke. as part of that experience.
The Push Drill.
The first drill is called the "Push Drill." It is designed to help you kinesthetically feel the correct movement of the arms and hands throughout the stroke. The overall objective is to allow absolutely no breakdown between the forearm of the leading arm and the putter shaft. This ensures a perfect pendulum stroke. It also helps tremendously with distance control. The hands are completely passive and will not get involved in "hitting" the ball, which causes a loss of distance control. This drill takes six weeks to perfect, but you can practice at any time. At the office or home for just a few minutes a day.


Putting Drills Week 1.
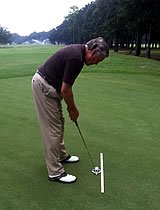
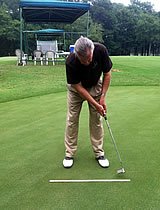
Put the putter directly behind the ball, as in picture #1. Without taking the clubhead back, push the putter head through, keeping the putter face square and the putter head low to the ground as in picture #2. Do not use a target. Just make sure you feel the upper part of the leading arm controlling this movement - no hands are to be involved at all. Notice that the leading arm's angle and the shaft have not changed between picture #1 and picture #2. Do not progress to week 2 until you can keep the putter head path going straight through and able to hold the putter face perfectly square on the follow-through.
Putting Drills Week 2.
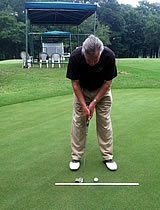
This is a similar drill, but this time place the ball at the 6" mark and the putter head at the 3" mark, as seen in picture #3.


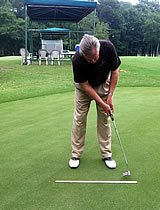
Now push the putter head through to the 12" mark, again making sure that you feel the upper part of the leading arm controlling the "push" with no breakdown between the forearm and the shaft. The toe of the putter must stay parallel to the ruler. The putter face must remain square. As you see in picture #4, I have a "very slight" breakdown myself when I do these drills. So I will continue to work on the "Push Drill" until I have it perfected.
Putting Drills Week 3.
Finally, put all of this together by making a continuous putting stroke, still using the ruler, still taking the putter head back half the distance of the follow-through. Week 4, 5 & 6 are the same as 1, 2 & 3 but with a target. Combining the first two lessons with these putting drills will make you a much better putter than you ever dreamed of!
Source: Mel Sole Golf School.
Thanks for reading - Great Putting Part 3 - Drills. For Parts 1 & 2, click the links below.
Related Posts.
Push Drill Improves Putting – Short Game Saturday #72.
3 Drills to Improve your Putting Stroke!
Great Putting Part 4 – Questions.
The Squat – Technical Thursday #11.
PLEASE SUBSCRIBE TO MY CHANNEL, LIKE THIS VIDEO, SHARE IT WITH A FRIEND, LEAVE A COMMENT!
